Prototype Laser-cut Lamp

Since our last meeting for the upcoming Chaos Communication Camp 2019, an idea got stuck in my head (many actually, but this post is just about that one):
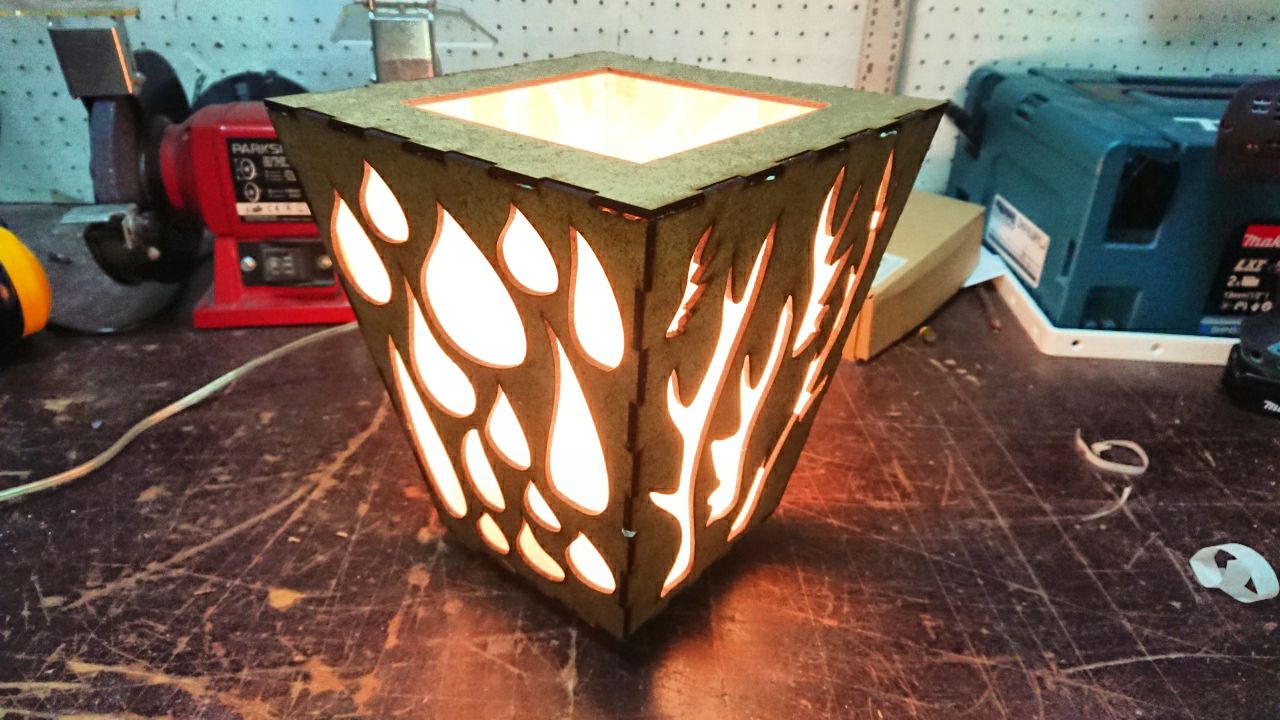
Lasercut some trapezoid lamps that make for a cosy atmosphere in our lounge tent. Leave enough space inside to put in any (battery powered) light at hand. Make them easy to assembly, so we just need to transport the sheets of wood and can easily assemble several of them at the location.

After a short discussion on IRC about who had time and ideas for the right approach, I decided to give it a try myself and see what I could do in about half a day.

See photos and videos in the gallery.


First I went looking for a trapezoid box maker. Turns out, there is none that I could find. Here is an otherwise impressive list of joint and box scripts, which I came across.

I decided to draw the box by hand in Inkscape, based on two different sized cubic boxes generated with an Inkscape extension. From these, I would take the top and bottom parts and create the trapezoid sides by rotating the generated finger-joint borders. So far so good. Of course I made a mistake and duplicated the wrong sides, but realized this in time to not waste any wood.

Lesen Sie weitere Prototype Laser-cut Lamp

LoTHR mini Electronics Workbench Upgrade

Our mini electronics all-in-one box for LoTHR (so people in LoTHR don’t have to walk all the way to TESLA for the quick and small stuff), got an upgrade.

The previously empty top slot now features an XY-FZ35 programmable electronic load. Test your power supply, test your batteries capacity, draw a discharge graph, use it in ways not intended by it’s makers. (But if you break or brick it, You Replace And Fix It ASAP!)

The tiny cut-out on the top left of the load, features a mini-USB jack where we put an USB serial-TTL converter connected to the GND,TX,RX pins of the load. Using the easy command-set you can indeed periodically poll your batteries discharge rate, voltage on so on.

But even without USB, the thing is pretty nifty and allows you to set a limit on the amount of mAh to draw, or to stop after a specified time, and so on.

LoTHR mini Electronics Workbench

As you might know, quite a while ago, our electronics lab TESLA moved to the second flat „W2“. There is a lot more space and equipment for electronic hackery now, BUT. We found that sometimes it would be nice to have some basic soldering capability in our main lounge „LoTHR“ as well. Fret no more, with our new workbench (Work in Progress) we also set up a a micro electronics area.

These absolute basics currently consisting of:

  1. Soldering Iron (DC/DC mini T12 Station)
  2. Lab-Power-Supply (DC/DC up to 30V / 5A)
  3. a Multimeter

Note that it is not meant to replace TESLA. Just to keep you from moving your project all the way to ‚W2″ if all you need to do is solder two wires or check one voltage.


Building the micro electronics box

Basically I got us a DPS3005 constant current / constant voltage power supply and a small KSGER soldering station and connected them to a 27V 3.5A power supply.

Then, as per Ernst’s suggestion, we put everything into a nice and sturdy box which formally housed external SCSI HDDs.

The front-panel was laser-cut so all the equipment would fit and voila, after a few hours putting everything together, here we are.

As a finishing touch, a T12-soldering-tip-holder was printed and taped to the side.

Further documentation can be found in our Wiki and more photos in our Gallery.

Testing the Box
Testing the Box